

Microservices with Spring Boot : Asynchronous Inter-Service Communication using RabbitMQ


In this article, we will see how two microservices developed using Spring Boot will asynchronously communicate with each other using Rabbit MQ
What are we going to build?
Use Case:
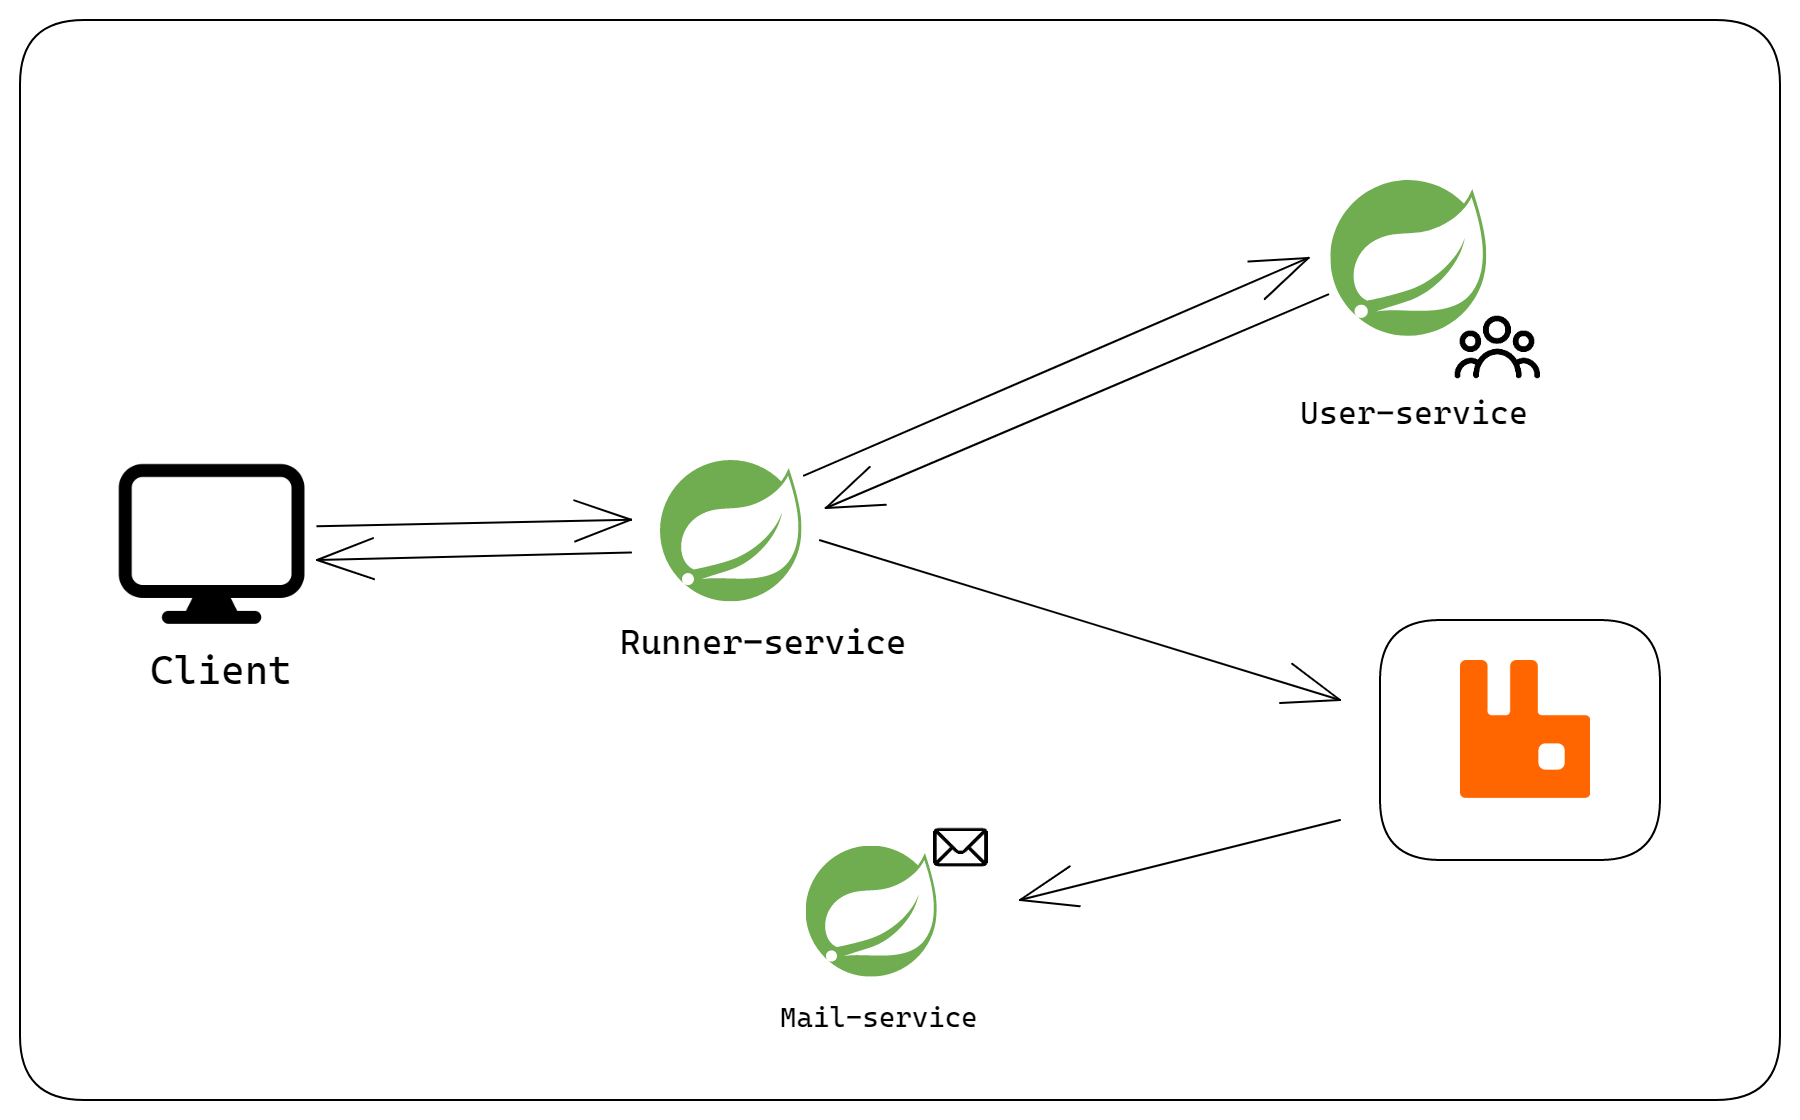
We will build a user service that creates new users and stores them in an embedded H2 database. We will have a mail service that sends a confirmation mail to the newly created users. We will have a runner service that the client can call to send the user details. The runner service will synchronously call the user service to create a new user and then publish the message to RabbitMQ which shall be consumed by the mail service.
Prerequisites
Docker (for running RabbitMQ instance on the machine)
Run the RabbitMQ instance on the docker
run -d --hostname rabbit-mq-instance --name rabbit-1 -p 15672:15672 -p 5672:5672 rabbitmq:3-management
Open localhost:15672 in the browser to see the RabbitMQ dashboard
Username : guest
Password : guest
Build the user service
Note: For this article, we will use maven.
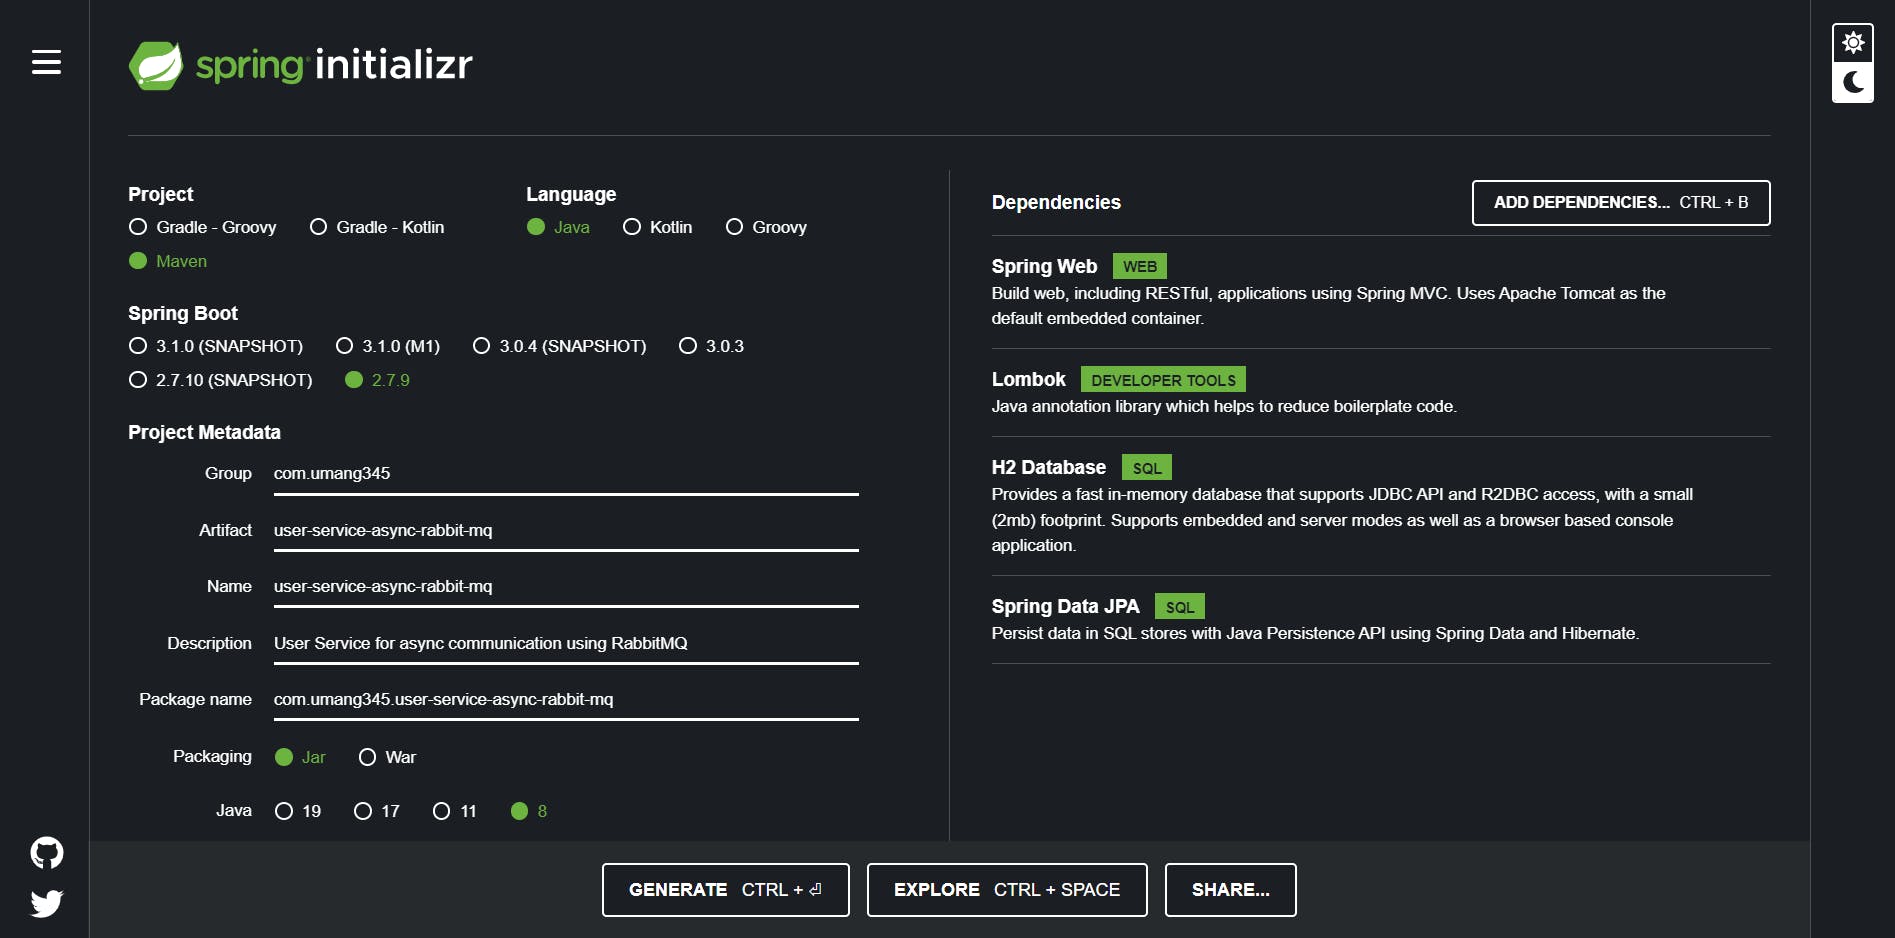
Add the following dependencies :
Spring Web
Lombok
Spring Data JPA
H2 Database
For this article, we are using Spring Boot version 2.7.8 and Java 11.
Click on Generate and open the project in an IDE (IntelliJ, Eclipse, VSCode, etc)
Create a User Entity
Create an entities package and inside it create a User.java class
entities/User.java
import lombok.*;

import javax.persistence.*;

@Entity
@Getter
@Setter
@ToString
@AllArgsConstructor
@NoArgsConstructor
@Builder
@Table(name = "users")
public class User
{
    @Id
    @GeneratedValue(strategy = GenerationType.AUTO)
    long id;
    String firstName;
    String lastName;
    String email;
}
Create a JPA Repository for User
Create a package named repositories and create an interface for the user JPA repository.
repositories/UserRepository.java
import com.umang345.userserviceasyncrabbitmq.entities.User;
import org.springframework.data.jpa.repository.JpaRepository;
import org.springframework.stereotype.Repository;

@Repository
public interface UserRepository extends JpaRepository<User, Long> {
}
Add database properties
Add H2 Database properties and server port in application.properties file
server.port=8081

spring.datasource.url=jdbc:h2:mem:testdb
spring.datasource.driverClassName=org.h2.Driver
spring.datasource.username=sa
spring.datasource.password=password
spring.jpa.database-platform=org.hibernate.dialect.H2Dialect

spring.h2.console.enabled=true
spring.h2.console.path=/h2
Define the methods in the UserService interface
We will create a service layer over the JPA layer. Create a service package and add a UserService interface.
services/UserService.java
import com.umang345.userserviceasyncrabbitmq.entities.User;
import org.springframework.stereotype.Service;


@Service
public interface UserService
{
    User createUser(User newUser);
}
Implement the UserService interface
We will add an implementation for the UserService interface.
services/UserServiceImpl.java
import com.umang345.userserviceasyncrabbitmq.entities.User;
import com.umang345.userserviceasyncrabbitmq.repositories.UserRepository;
import org.springframework.beans.factory.annotation.Autowired;
import org.springframework.stereotype.Service;

@Service
public class UserServiceImpl implements UserService {

    @Autowired
    private UserRepository userRepository;

    @Override
    public User createUser(User newUser) {
        User savedUser = userRepository.save(newUser);
        return savedUser;
    }
}
Create a DTO for User Response
Create a class UserResponseDto to wrap and return the response and status of the newly created user.
entities/ UserResponseDto.java
import lombok.*;

@Getter
@Setter
@AllArgsConstructor
@NoArgsConstructor
@ToString
@Builder
public class UserResponseDto
{
    Integer status;
    User data;
}
Add the Controller for the User
We will implement a UserController that will expose the endpoints for the CRUD operations.
controllers/UserController.java
import com.umang345.userserviceasyncrabbitmq.entities.User;
import com.umang345.userserviceasyncrabbitmq.entities.UserResponseDto;
import com.umang345.userserviceasyncrabbitmq.services.UserService;
import org.springframework.beans.factory.annotation.Autowired;
import org.springframework.http.HttpStatus;
import org.springframework.http.ResponseEntity;
import org.springframework.web.bind.annotation.PostMapping;
import org.springframework.web.bind.annotation.RequestBody;
import org.springframework.web.bind.annotation.RequestMapping;
import org.springframework.web.bind.annotation.RestController;

@RestController
@RequestMapping("/users")
public class UserController
{
    @Autowired
    private UserService userService;

    @PostMapping
    public ResponseEntity<?> createUser(@RequestBody User newUser) {
        User createdUser = userService.createUser(newUser);
        UserResponseDto response = UserResponseDto.builder()
                                    .status(HttpStatus.CREATED.value())
                                    .data(createdUser)
                                    .build();
        return ResponseEntity.ok().body(response);
    }
}
pom.xml
The pom.xml for the user service must contain the following dependencies :
<dependencies>
        <dependency>
            <groupId>org.springframework.boot</groupId>
            <artifactId>spring-boot-starter-data-jpa</artifactId>
        </dependency>
        <dependency>
            <groupId>org.springframework.boot</groupId>
            <artifactId>spring-boot-starter-web</artifactId>
        </dependency>

        <dependency>
            <groupId>com.h2database</groupId>
            <artifactId>h2</artifactId>
            <scope>runtime</scope>
        </dependency>
        <dependency>
            <groupId>org.projectlombok</groupId>
            <artifactId>lombok</artifactId>
            <optional>true</optional>
        </dependency>
        <dependency>
            <groupId>org.springframework.boot</groupId>
            <artifactId>spring-boot-starter-test</artifactId>
            <scope>test</scope>
        </dependency>
    </dependencies>

    <build>
        <plugins>
            <plugin>
                <groupId>org.springframework.boot</groupId>
                <artifactId>spring-boot-maven-plugin</artifactId>
                <configuration>
                    <excludes>
                        <exclude>
                            <groupId>org.projectlombok</groupId>
                            <artifactId>lombok</artifactId>
                        </exclude>
                    </excludes>
                </configuration>
            </plugin>
        </plugins>
    </build>
With this, we complete our user service.
Build the Mail service
Now we will build the mail service that is asynchronously called by the runner service.
Go to https://start.spring.io/
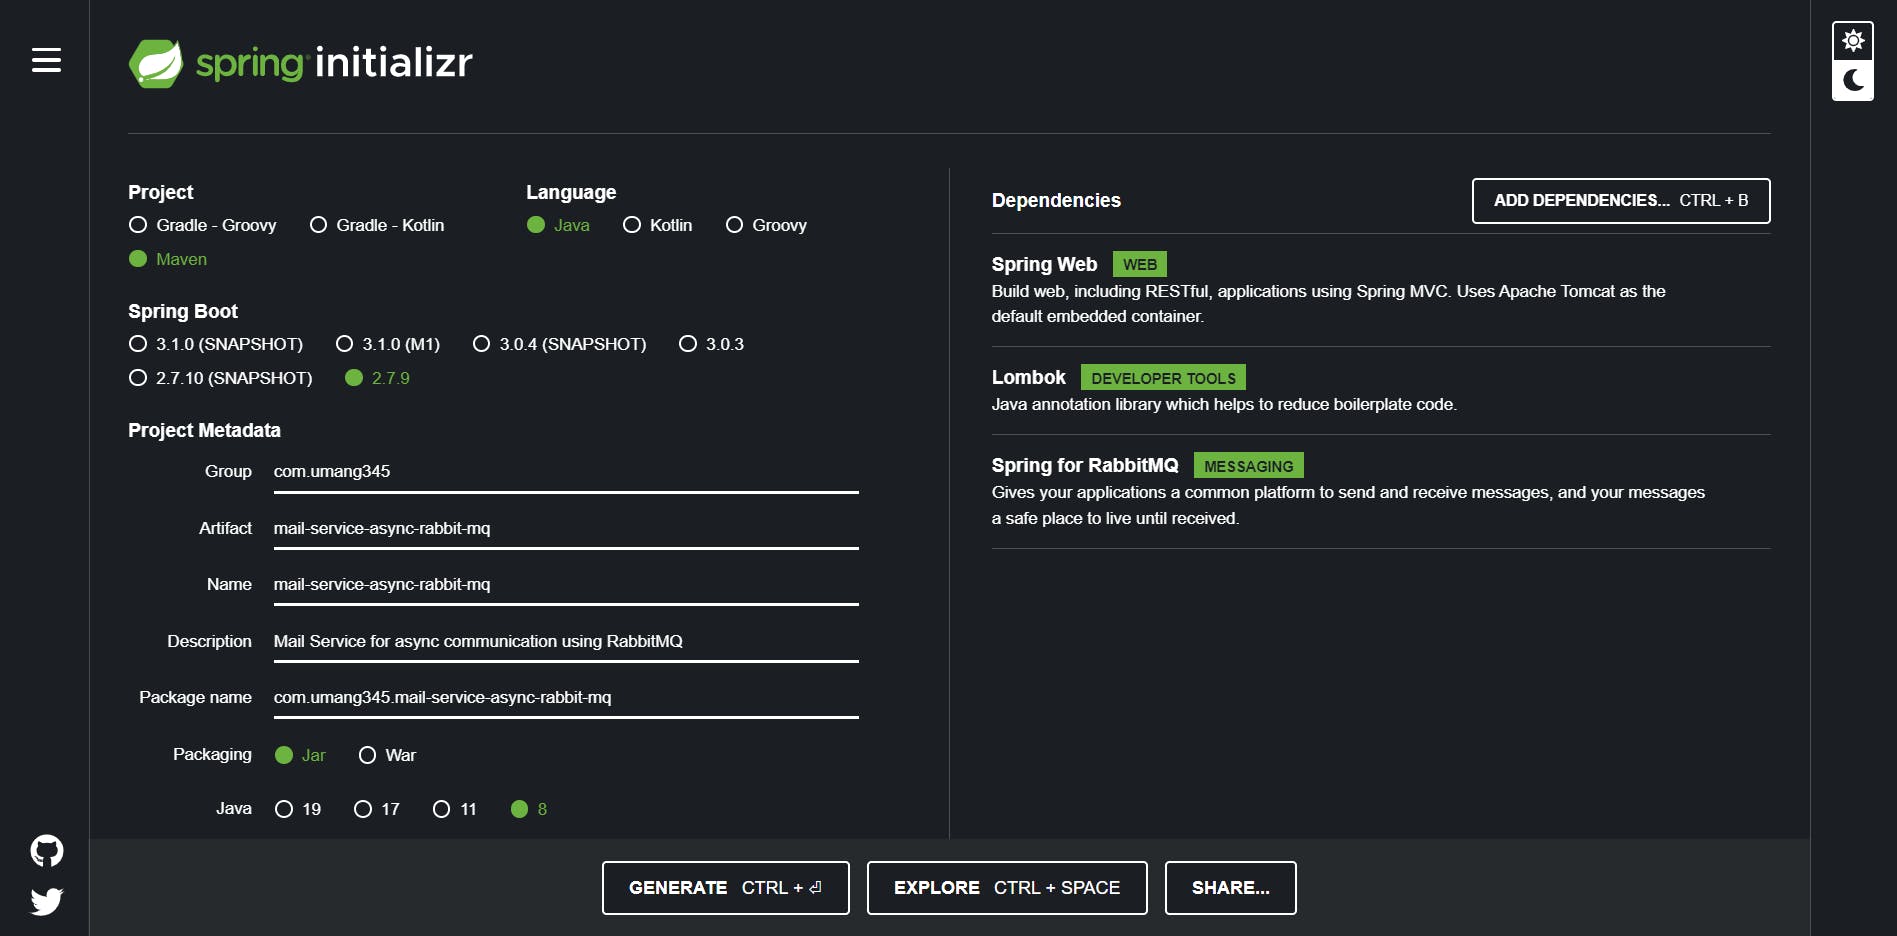
Add the following dependencies :
Spring Web
Lombok
Spring for RabbitMQ
For this article, we are using Spring Boot version 2.7.8 and Java 11.
Click on Generate and open the project in an IDE (IntelliJ, Eclipse, VSCode, etc)
Add the mail dependency
Add the following dependency in the pom.xml file.
<!-- https://mvnrepository.com/artifact/com.sun.mail/javax.mail -->
<dependency>
    <groupId>com.sun.mail</groupId>
    <artifactId>javax.mail</artifactId>
    <version>1.6.2</version>
</dependency>
pom.xml
The pom.xml of the mail service should contain the following dependencies.
<dependencies>
        <dependency>
            <groupId>org.springframework.boot</groupId>
            <artifactId>spring-boot-starter-web</artifactId>
        </dependency>

        <dependency>
            <groupId>org.springframework.boot</groupId>
            <artifactId>spring-boot-starter-amqp</artifactId>
        </dependency>

        <dependency>
            <groupId>org.projectlombok</groupId>
            <artifactId>lombok</artifactId>
            <optional>true</optional>
        </dependency>

        <!-- https://mvnrepository.com/artifact/com.sun.mail/javax.mail -->
        <dependency>
            <groupId>com.sun.mail</groupId>
            <artifactId>javax.mail</artifactId>
            <version>1.6.2</version>
        </dependency>

        <dependency>
            <groupId>org.springframework.boot</groupId>
            <artifactId>spring-boot-starter-test</artifactId>
            <scope>test</scope>
        </dependency>
    </dependencies>

    <build>
        <plugins>
            <plugin>
                <groupId>org.springframework.boot</groupId>
                <artifactId>spring-boot-maven-plugin</artifactId>
                <configuration>
                    <excludes>
                        <exclude>
                            <groupId>org.projectlombok</groupId>
                            <artifactId>lombok</artifactId>
                        </exclude>
                    </excludes>
                </configuration>
            </plugin>
        </plugins>
    </build>
Create the User entity
We will create the same user entity for the runner class by adding the database properties.
entities/User.java
@Getter
@Setter
@ToString
@AllArgsConstructor
@NoArgsConstructor
@Builder
public class User
{
    long id;
    String firstName;
    String lastName;
    String email;
}
Define the server post and authentication properties
server.port=8082

authentication.username=<Sender Email Id>
authentication.password=<Sender Password>

spring.rabbitmq.addresses = localhost:5672
Note: Replace the above properties with the email credentials from which you want to send the mail.
Add an interface for the Mail Service.
Create a MailService interface and define the method to send the mail.
services/MailService.java
import org.springframework.stereotype.Service;

@Service
public interface MailService
{
    void sendMail(String message, String subject, String to, String from);
}
Add the implementation for the MailSerice interface.
Create a MailServiceImpl class them implements the MailService interface.
services/MailServiceImpl.java
import org.springframework.beans.factory.annotation.Value;
import org.springframework.stereotype.Service;

import javax.mail.*;
import javax.mail.internet.InternetAddress;
import javax.mail.internet.MimeMessage;
import java.util.Properties;

@Service
public class MailServiceImpl implements MailService
{

    @Value("${authentication.username}")
    private String AUTHENTICATION_USERNAME;

    @Value("${authentication.password}")
    private String AUTHENTICATION_PASSWORD;

    @Override
    public void sendMail(String message, String subject, String to, String from) {
        //Variable for gmail
        String host="smtp.gmail.com";

        //get the system properties
        Properties properties = System.getProperties();
        System.out.println("PROPERTIES "+properties);

        //setting important information to properties object

        //host set
        properties.put("mail.smtp.host", host);
        properties.put("mail.smtp.port","465");
        properties.put("mail.smtp.ssl.enable","true");
        properties.put("mail.smtp.auth","true");

        //Step 1: to get the session object..
        Session session=Session.getInstance(properties, new Authenticator() {
            @Override
            protected PasswordAuthentication getPasswordAuthentication() {
                return new PasswordAuthentication(AUTHENTICATION_USERNAME,
                        AUTHENTICATION_PASSWORD);
            }
        });

        session.setDebug(true);

        //Step 2 : compose the message [text,multi media]
        MimeMessage m = new MimeMessage(session);


        try {

            //from email
            m.setFrom(from);

            //adding recipient to message
            m.addRecipient(Message.RecipientType.TO, new InternetAddress(to));

            //adding subject to message
            m.setSubject(subject);


            //adding text to message
            m.setText(message);

            //send

            //Step 3 : send the message using Transport class
            Transport.send(m);

            System.out.println("Sent success...................");


        }catch (Exception e) {
            e.printStackTrace();
        }

    }
}
Add the Mail Controller
Create a class MailController that contains the endpoint to send the mail.
controllers/MailController.java
import com.umang345.mailserviceasyncrabbitmq.config.UserMessageQueueConfig;
import com.umang345.mailserviceasyncrabbitmq.entities.UserMailQueueMessage;
import com.umang345.mailserviceasyncrabbitmq.services.MailService;
import org.springframework.amqp.rabbit.annotation.RabbitListener;
import org.springframework.beans.factory.annotation.Autowired;
import org.springframework.beans.factory.annotation.Value;
import org.springframework.web.bind.annotation.RequestMapping;
import org.springframework.web.bind.annotation.RestController;


@RestController
@RequestMapping("/mail")
public class MailController
{
    @Autowired
    private MailService mailService;

    @Value("${authentication.username}")
    private String FROM;

    @RabbitListener(queues = UserMessageQueueConfig.USER_QUEUE_NAME)
    public void listener(UserMailQueueMessage queueMessage)
    {
        System.out.println(queueMessage);

        StringBuilder message = new StringBuilder();
        message.append("Hi ");
        message.append(queueMessage.getUserMessage().getFirstName());
        message.append(", Your new account is created Successfully");
        String subject = "New Account Created";

        mailService.sendMail(
                message.toString(),
                subject,
                queueMessage.getUserMessage().getEmail(),
                FROM
        );
    }
}
Add Configuration for the queue
Create a UserMessageQueueConfig.java and add the required beans for the messaging queue.
configs/UserMessageQueueConfig.java
import org.springframework.amqp.core.*;
import org.springframework.amqp.rabbit.connection.ConnectionFactory;
import org.springframework.amqp.rabbit.core.RabbitTemplate;
import org.springframework.amqp.support.converter.Jackson2JsonMessageConverter;
import org.springframework.amqp.support.converter.MessageConverter;
import org.springframework.context.annotation.Bean;
import org.springframework.context.annotation.Configuration;

@Configuration
public class UserMessageQueueConfig
{

    public static final String USER_QUEUE_NAME="rbtmq_user_message_queue";

    public static final String EXCHANGE_NAME="rbtmq_user_message_exchange";

    public static final String ROUTING_KEY="rbtmq_user_routing_key";

    @Bean
    public Queue queue()
    {
        return new Queue(USER_QUEUE_NAME);
    }

    @Bean
    public TopicExchange topicExchange()
    {
        return new TopicExchange(EXCHANGE_NAME);
    }

    @Bean
    public Binding binding(Queue queue, TopicExchange topicExchange)
    {
        return BindingBuilder
                .bind(queue)
                .to(topicExchange)
                .with(ROUTING_KEY);
    }

    @Bean
    public MessageConverter messageConverter()
    {
        return new Jackson2JsonMessageConverter();
    }

    @Bean
    public AmqpTemplate template(ConnectionFactory connectionFactory)
    {
        RabbitTemplate rabbitTemplate = new RabbitTemplate(connectionFactory);
        rabbitTemplate.setMessageConverter(messageConverter());
        return rabbitTemplate;
    }
}
Create a structure for the message
Create a UserMailQueueMessage.java and specify the structure of the message to be passed in the queue.
entities/UserMailQueueMessage.java
import lombok.*;

import java.util.Date;

@Data
@AllArgsConstructor
@NoArgsConstructor
@ToString
@Builder
public class UserMailQueueMessage
{
    private String mailQueueMessageId;
    private User userMessage;
    private Date queueMessageDate;
}
With this, we complete our mail service.
Build the Runner Service
Now we will build the runner service that is directly called by the client.
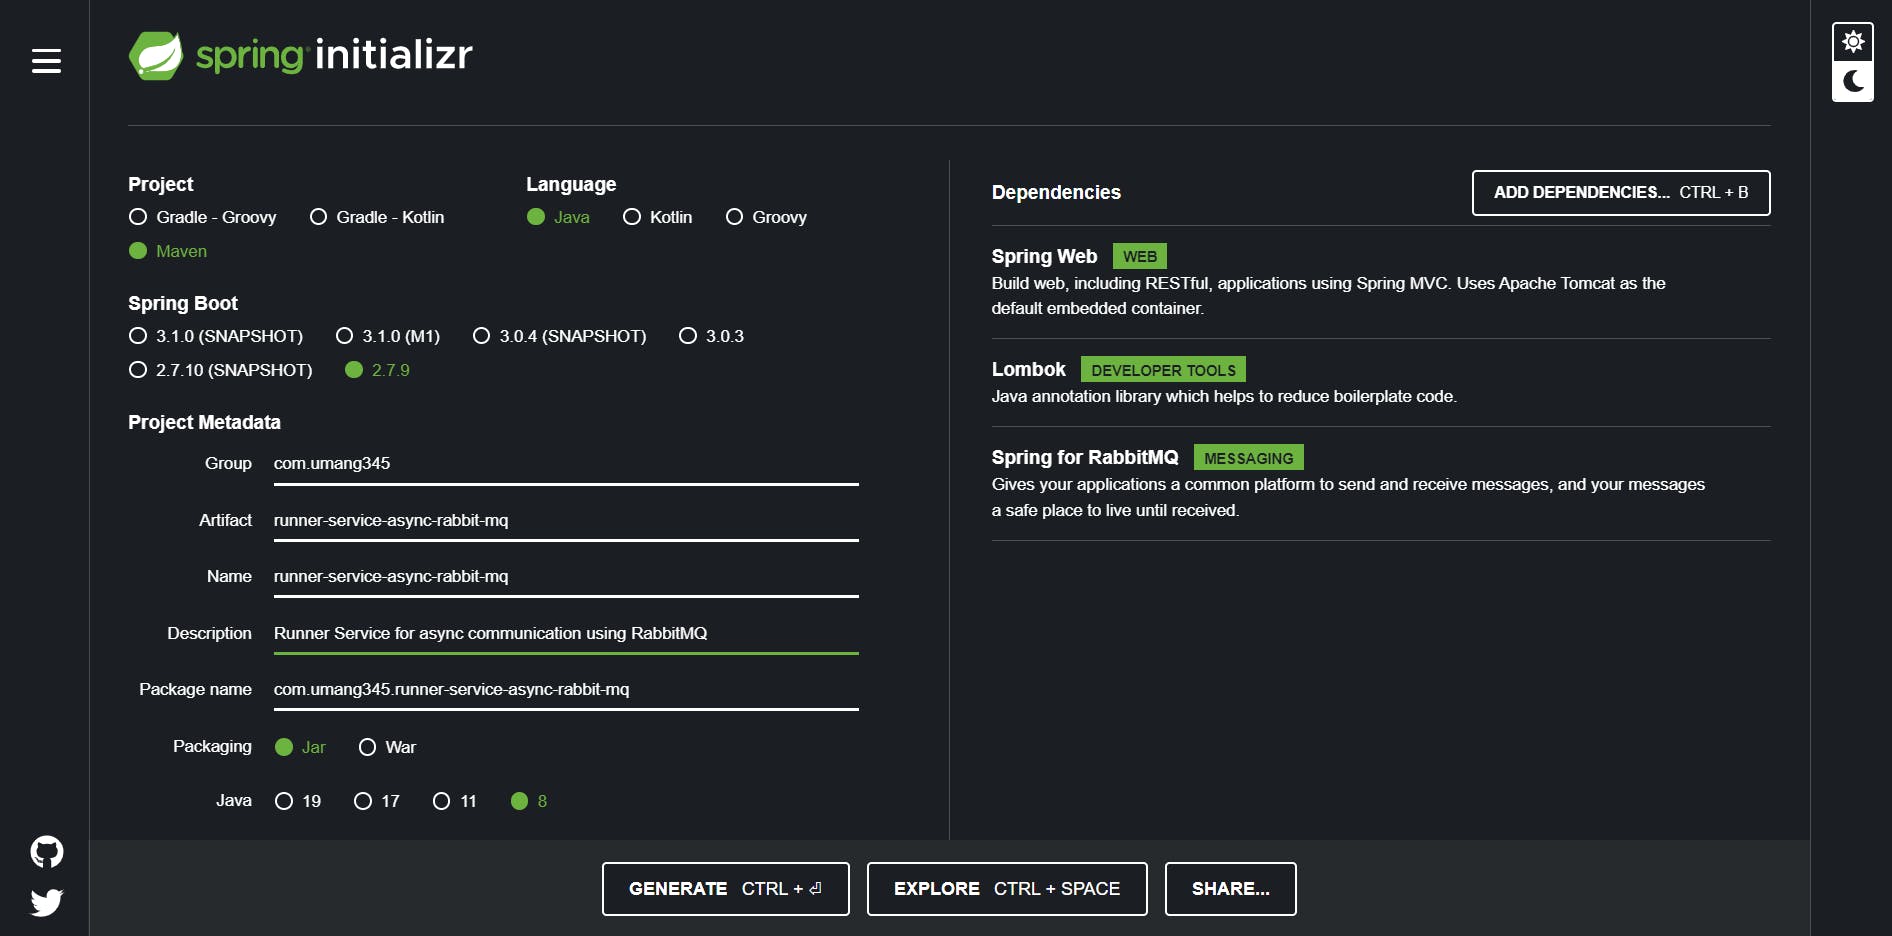
Add the following dependencies :
Spring Web
Lombok
Spring for RabbitMQ
For this article, we are using Spring Boot version 2.7.9 and Java 11.
Click on Generate and open the project in an IDE (IntelliJ, Eclipse, VSCode, etc)
Create the User entity
We will create the same user entity for the runner class by adding the database properties.
entities/User.java
@Getter
@Setter
@ToString
@AllArgsConstructor
@NoArgsConstructor
@Builder
public class User
{
    long id;
    String firstName;
    String lastName;
    String email;
}
Create a DTO for User Response
Create a class UserResponseDto to receive the response and status of the newly created user from the user service.
entities/ UserResponseDto.java
import lombok.*;

@Getter
@Setter
@AllArgsConstructor
@NoArgsConstructor
@ToString
@Builder
public class UserResponseDto
{
    Integer status;
    User data;
}
Create a DTO for Runner Response
Create a class RunnerResponseDto to wrap and return the response to the client
entities/RunnerResponseDto.java
 import lombok.*;

@Getter
@Setter
@ToString
@AllArgsConstructor
@NoArgsConstructor
@Builder
public class RunnerResponseDto
{
    User user;
    String message;
}
Add a Bean for the RestTemplate
Create a MyConfiguration class to add a bean for RestTemplate
configs/MyConfiguration.java
import org.springframework.context.annotation.Bean;
import org.springframework.context.annotation.Configuration;
import org.springframework.web.client.RestTemplate;

@Configuration
public class MyConfiguration
{
    @Bean
    public RestTemplate getRestTemplate() {
        return new RestTemplate();
    }
}
Set the server port and URL properties
In the application.properties file set the server port, service URLs and RabbitMQ configs.
server.port=8080

spring.rabbitmq.addresses = localhost:5672

url.user-service=http://localhost:8081/users
url.mail-service=http://localhost:8082/mail
Add Configuration for the queue
Create a UserMessageQueueConfig.java and add the required beans for the messaging queue.
configs/UserMessageQueueConfig.java
import org.springframework.amqp.core.*;
import org.springframework.amqp.rabbit.connection.ConnectionFactory;
import org.springframework.amqp.rabbit.core.RabbitTemplate;
import org.springframework.amqp.support.converter.Jackson2JsonMessageConverter;
import org.springframework.amqp.support.converter.MessageConverter;
import org.springframework.context.annotation.Bean;
import org.springframework.context.annotation.Configuration;

@Configuration
public class UserMessageQueueConfig
{

    public static final String USER_QUEUE_NAME="rbtmq_user_message_queue";

    public static final String EXCHANGE_NAME="rbtmq_user_message_exchange";

    public static final String ROUTING_KEY="rbtmq_user_routing_key";

    @Bean
    public Queue queue()
    {
        return new Queue(USER_QUEUE_NAME);
    }

    @Bean
    public TopicExchange topicExchange()
    {
        return new TopicExchange(EXCHANGE_NAME);
    }

    @Bean
    public Binding binding(Queue queue, TopicExchange topicExchange)
    {
        return BindingBuilder
                .bind(queue)
                .to(topicExchange)
                .with(ROUTING_KEY);
    }

    @Bean
    public MessageConverter messageConverter()
    {
        return new Jackson2JsonMessageConverter();
    }

    @Bean
    public AmqpTemplate template(ConnectionFactory connectionFactory)
    {
        RabbitTemplate rabbitTemplate = new RabbitTemplate(connectionFactory);
        rabbitTemplate.setMessageConverter(messageConverter());
        return rabbitTemplate;
    }
}
Create a structure for the message
Create a UserMailQueueMessage.java and specify the structure of the message to be passed in the queue.
entities/UserMailQueueMessage.java
import lombok.*;

import java.util.Date;

@Data
@AllArgsConstructor
@NoArgsConstructor
@ToString
@Builder
public class UserMailQueueMessage
{
    private String mailQueueMessageId;
    private User userMessage;
    private Date queueMessageDate;
}
pom.xml
The pom.xml of the runner service should contain the following dependencies.
pom.xml
<dependencies>
        <dependency>
            <groupId>org.springframework.boot</groupId>
            <artifactId>spring-boot-starter-amqp</artifactId>
        </dependency>
        <dependency>
            <groupId>org.springframework.boot</groupId>
            <artifactId>spring-boot-starter-web</artifactId>
        </dependency>

        <dependency>
            <groupId>org.projectlombok</groupId>
            <artifactId>lombok</artifactId>
            <optional>true</optional>
        </dependency>
        <dependency>
            <groupId>org.springframework.boot</groupId>
            <artifactId>spring-boot-starter-test</artifactId>
            <scope>test</scope>
        </dependency>
        <dependency>
            <groupId>org.springframework.amqp</groupId>
            <artifactId>spring-rabbit-test</artifactId>
            <scope>test</scope>
        </dependency>
    </dependencies>

    <build>
        <plugins>
            <plugin>
                <groupId>org.springframework.boot</groupId>
                <artifactId>spring-boot-maven-plugin</artifactId>
                <configuration>
                    <excludes>
                        <exclude>
                            <groupId>org.projectlombok</groupId>
                            <artifactId>lombok</artifactId>
                        </exclude>
                    </excludes>
                </configuration>
            </plugin>
        </plugins>
    </build>
Create the Runner Controller
Create a class RunnerController that contains an endpoint that the user calls to send the user details to create a new User.
controllers/RunnerController.java
import com.umang345.runnerserviceasyncrabbitmq.configs.UserMessageQueueConfig;
import com.umang345.runnerserviceasyncrabbitmq.entities.RunnerResponseDto;
import com.umang345.runnerserviceasyncrabbitmq.entities.User;
import com.umang345.runnerserviceasyncrabbitmq.entities.UserMailQueueMessage;
import com.umang345.runnerserviceasyncrabbitmq.entities.UserResponseDto;
import org.springframework.amqp.rabbit.core.RabbitTemplate;
import org.springframework.beans.factory.annotation.Autowired;
import org.springframework.beans.factory.annotation.Value;
import org.springframework.http.HttpEntity;
import org.springframework.http.HttpMethod;
import org.springframework.http.HttpStatus;
import org.springframework.http.ResponseEntity;
import org.springframework.web.bind.annotation.PostMapping;
import org.springframework.web.bind.annotation.RequestBody;
import org.springframework.web.bind.annotation.RequestMapping;
import org.springframework.web.bind.annotation.RestController;
import org.springframework.web.client.RestTemplate;

import java.util.Date;
import java.util.UUID;

@RestController
@RequestMapping("/simulate/users")
public class RunnerController
{
    @Autowired
    private RestTemplate restTemplate;

    @Autowired
    private RabbitTemplate rabbitTemplate;

    @Value("${url.user-service}")
    private String userServiceUrl;

    @Value("${url.mail-service}")
    private String mailServiceUrl;

    @PostMapping
    public ResponseEntity<?> createUser(@RequestBody User newUser){
        ResponseEntity<UserResponseDto> response = null;
        try {

            response = restTemplate.exchange(userServiceUrl,HttpMethod.POST,new HttpEntity<>(newUser), UserResponseDto.class);

            if(response.getBody().getStatus() != HttpStatus.CREATED.value())
            {
                throw new Exception("Error while creating user");
            }

            User createdUser = response.getBody().getData();

            RunnerResponseDto responseDto = RunnerResponseDto
                    .builder()
                    .user(createdUser)
                    .message("User created successfully. Mail will be sent shortly")
                    .build();


            UserMailQueueMessage userMailQueueMessage =
                    UserMailQueueMessage.builder()
                    .mailQueueMessageId(UUID.randomUUID().toString())
                    .queueMessageDate(new Date())
                    .userMessage(newUser)
                    .build();

            rabbitTemplate.convertAndSend(
                    UserMessageQueueConfig.EXCHANGE_NAME,
                    UserMessageQueueConfig.ROUTING_KEY,
                    userMailQueueMessage
            );

            return ResponseEntity.status(HttpStatus.OK).body(responseDto);
        }catch (Exception e) {
            e.printStackTrace();
            return ResponseEntity.status(HttpStatus.INTERNAL_SERVER_ERROR).body(e.getMessage());
        }
    }
}
With this, we complete our runner service.
Now, let's test our app
Start all the services.
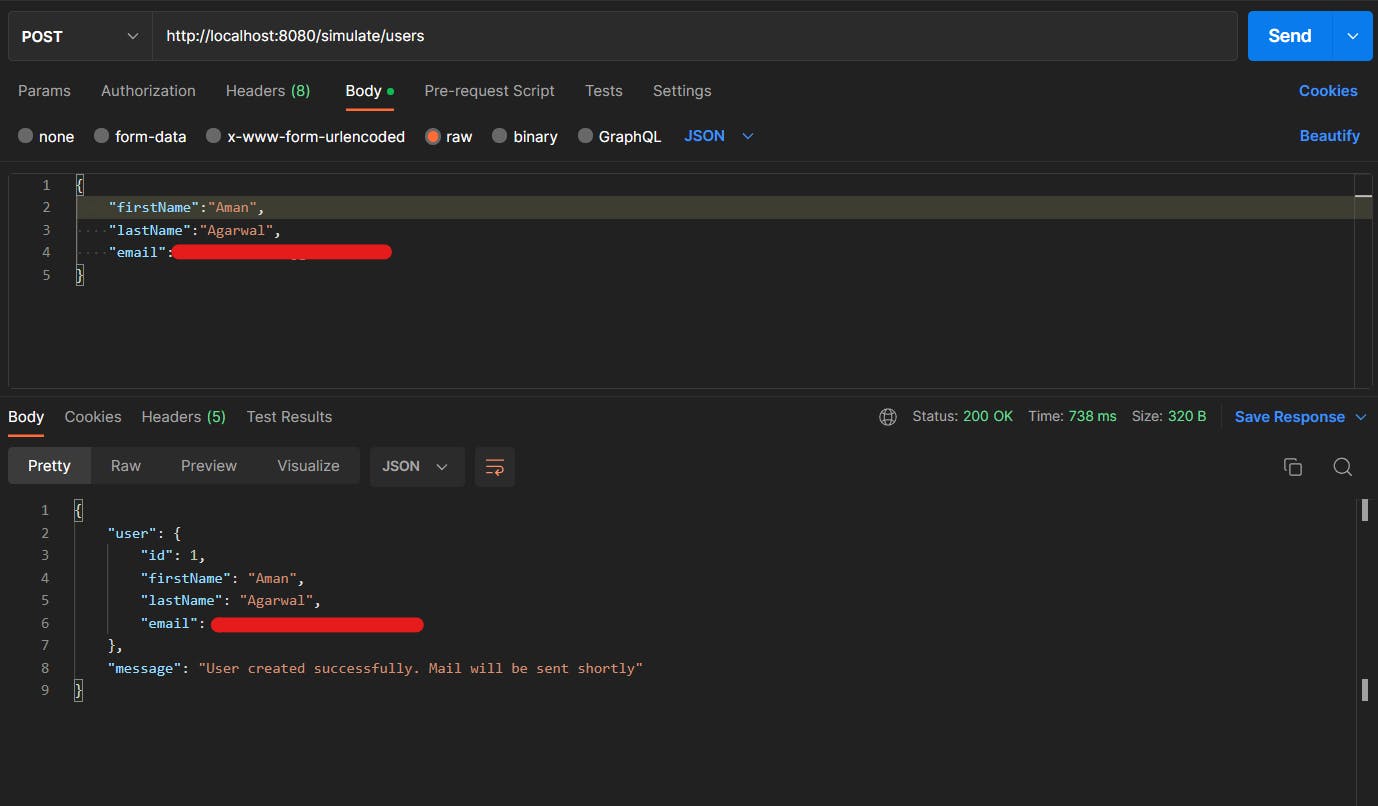
Will will hit the endpoint
POST http://localhost:8080/simulate/users
{
    "firstName":"Aman",
    "lastName":"Agarwal",
    "email":<Enter a Valid Email Id>
}
Note: Replace a valid mail in the email field.
Find the source code of the project on GitHub.
Do star the repository to access the source code of all the articles.
I hope you found the article useful.
Let's connect :
Happy Coding :)